Sunday, February 28, 2016

Sympathy card

I needed to make a sympathy card and I thought I would try using negativity. It really makes the picture pop.  I got this idea when I visited page by Melissa Dawn Lane - Sunset – Beautiful Negativity.   She also has a great step by step slide video.  I gave it a try and here's my final result.  I really like the results.
 

Here's the inside:


First I made the sunset using a Stampin Up colors : Temping Turquoise, Daffodil Delight, and Tangerine Tango. 


I then stamped the tree image from Stampin' Up! Thoughts & Prayers Stamp Set.  The sentiments are from the same set as well.


I cut down the tree and sunset and taped it on some orange cardstock.  I then cut an oval in black with my Lil Inkers Stitched Ovals.  I used 3M mounting tape to pop the black card stock over the tree with the sunset.
 
Thanks for visiting!  Have a great day.
 
As always any comments are always greatly appreciated!
 
Diane
 

Friday, February 26, 2016

Shake, Rattle & Roll


I decided to use one of the new AI stamps. These girls are having so much fun. To me it looks like that they are at some sort of fun party or reception and are goofing off in the photo booth getting their picture taken.
 
 
I colored the girls with Copics using the following colors. 
Dresses- R24 R27; B04 B06; V04 V06; Hair - E35 E23; Y28 Y15; E07 E04; Skin.- E50 E51 R20.  I added more glitter and shine to their jewelry, shoes, & photo props using my Wink of Stella pens.
 
I made the shaker by putting together two rectangles & then cutting three times from a leftover piece of cardboard.  I learned this technique by the great details from Karen Day from the AI blog.


I cut out a camera using my Silhouette & cut the rectangle using the inside rectangle used above.  I cut a piece of acetate using the outside rectangle.
 
I used some black, grey, & white camera print paper in for the background. I felt that the black & white background, and the black camera really made the colors of the girls really pop!  I used some square sequins to shake inside.  I glue some of those some sequins around the card just to have it all blend together.  I really like the effect.
 
Here' a few side views of the cards with the sequins shook around.


Here's another view with all the sequins piled at their feet.
 

Thanks for stopping by.  Have a wonderful day!!
Any comments are always read and greatly appreciated!

Diane

I have entered this card in the following challenges:
Art Impression Challenge 178-Shake, Rattle, & Roll

And

Challenge #220 - Anything Goes

Grab our badge:


Wednesday, February 24, 2016

WOYWW 351


Well not much has changed. Busy week and a crop in Saturday so my desk is still a mess.   But in still showing it. Eventually there will be improvement!!!  LOL


But it's still a work in progress.  With another busy week ahead I doubt it will be complete next week. But each day it will get some better.   I did get some new paper racks. So I'm trying to redo this one space in my room. Of course that also means everything that WAS on this desk is in the floor until I find new homes for it. But that out of the puncture so you don't know about the messy floor.  Oh wait. I guess you do now. 😉

ANYWAY.... Here's a picture of the one clean spot in my room. I haven't finished filling the racks but I got started. I put my solid 8 1/2 x 11 cardstock on the single rack. Then I just put miscellaneous 12 x 12 packs on the double rack. You know. Those packs there were on sale so I HAD to get them. Never mind that I have an entire cabinet FILLED with all sorts of packs of 12 x12 paper. But that for another day.  
And you all thought I had a lot of dies.  That's nothing compared to my paper!!!  LOL


I also turned my shelf on it's side to place the paper racks on top.  The shelf holds most of my Stampin' Up stamp sets.  And you all thought I had a lot of dies. Also if you see the big rings on hanging at the bottom of the paper racks - one on each side.  Those are my washi tapes.  The are slid on a belt ring holder.  I got this idea when I saw someone else had done it at a crop I attended.  The loop & tapes can move around and you can get the one tape you want to the opening easily.

Thanks for visiting my obsessions. I means my craft space. Please keep visiting and sharing your stories and storage ideas. 


Have a great day!!!!


Diane

Sunday, February 21, 2016

Rainbows for April

This week's theme at April's blog is rainbows.  So this is what I made for her.


Like the Irish card I made for her last week.  I made the background again like the video by Jennifer McGuire.  So first I stamped with the Hero Arts background stamp and used clear embossing.  Then I distressed ink diagonally  - barn door, dried marigold, mustard seed, mowed lawn, and salty ocean.  I then sprayed it with water mixed with perfect pearls.

I did stamps & embossed the THANKS for Stampin' Up Sale-a-Bration "For being you" set.   Again I colored the background using the same colors before.  Here's a look at the thanks before I sprayed it.


I again sprayed the "thanks" with the water mixed with perfect pearls.  Here's a side view of the effect the perfect pearls had.


Thanks again for stopping by.  Have a great day.  Any and all comments are greatly appreciated.

Diane

Thursday, February 18, 2016

Die Storage

Earlier I posted the messy desk with all my dies.  After work today I started to work on my die organization.  I am using these Totally-Tiffany Die-Namic Die Storage Cases.  

 
These storage cases are great on their own, but I like to use a magnetic piece and CD storage.  I use magnetic dust covers that I got at Home Depot.


I cut them into squares.


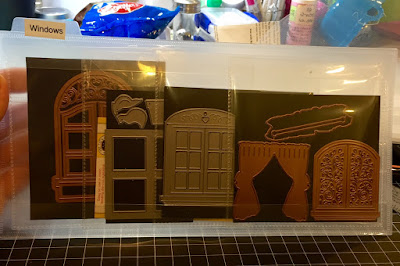
One of my window dies is the Art Impression Window Die.  I put the die on the square cut from  magnet dust cover.  Then I put it in the CD sleeve - that way just in case some thing drops, it still stays together in the sleeve.


Then I put all my different windows on one panel from the Die-Namic Die storage and label it.

 
This is the storage case that I have completed.  Each sleeve has a label - Squares, Triangles, Ovals, Circles, Stars/Hearts/Hexagons.  


Then when you need one, you just pull the sleeve.


I still have more to finish.  And eventually I will get them all done.  :)

Thanks for stopping by.  Have a great day

As always comments are welcome and appreciated.

Thanks!

Diane

Wednesday, February 17, 2016

WOYWW 350

OK.  This is my first post on  WOYWW 350 over at Julia’s Stamping Ground.  I'm excited to be a part of it!!!


My desk is a MESS - my whole room is a mess.  So I'm starting to organize.  It's not going to get clean and perfect over night - it will be a long process.  What better way to figure out how to organize your space then to see how others are doing theirs.  I can't wait to visit across the world from my couch and get tons of ideas.


Here's my mess.  Dies, dies, dies.  That's what I am working on first.  So here's a couple of pictures of my work space.  It's a pile of dies I'm trying to organize.


I LOVE these Totally-Tiffany Die-Namic Die Storage Case.  I have several of these.  I do have1 case completely organized (I'll update later with a picture, I don't have it with me!!! sorry).  In one case you have 5 tabbed sleeves in each case.  In my ONE good organized case I have circles, squares, ovals, triangles -  each plain & scalloped. 


Tomorrow I will update a picture of my dies all nice and organized.  Well, at least that's my plan.


Thanks for stopping by. Please let me know if you have any advice on organizing - I am open to any and all suggestions.  As you can see, I'm a work in progress!


Thanks!


Diane

Monday, February 15, 2016

Love is in the air

Here's another card for the Art Impressions Love Love Love! Challenge 177.    I used the set -Art Impressions® Clear Stamp Set, His & Hers Flying I got from Michaels.  Here's the card, then I will give a little more details.


First I stamped the image on white cardstock & colored with my Copic markers.  I decided that I wanted the plane to be flying through a sky of hearts.  I first had to stamp & fussy cut the image to use as a mask. 

 
I put the mask over my colored image.  I then used the hearts stencil from Stampin' Up & Tim Holtz Distress Ink - Barn Door. 

 
After I added the hearts with the stencil I lifted off the image mask.  What was left was the plane flying through a sky of hearts, just like I envisioned.  :) 


I wanted a little more dimension to the card, so I colored the propeller again and added 3D Crystal Lacquer. 


I cut it out and popped it up with a 3D Zot.  I got the sentiment from a hot air balloon set by Dare 2B Artsy - Lift Up Your Spirits.  I cut out the sentiment using a cloud die.

 
I had a lot of fun playing around with this card.  I hope you had some fun visiting my blog.

Thanks for stopping by. 
Comments and advice are always welcome!

Diane


I also added this card to the challenge at "Come and Get It Challenge". 
I also included this card in the Challenge #148 in the Aud Sentiments Challenge blog.

Sunday, February 14, 2016

April's Irish

Well this week's theme for April is Irish & Leprechauns.    I finally found some Leprechaun stickers, but didn't come close to matching the background I already made, so NO Leprechauns.  :)
 
And this is probably still a stretch...I mean it has luck and a four leaf clover, so close enough for horseshoes.  So here's my card:


I watched a video by Jennifer McGuire.   Please watch her video for yourself - you'll be glad you did.  It's an excellent tutorial.  My first attempt did not turn out as good as hers, but I'll get better. 
 
So first I stamped with the Hero Arts background stamp and used clear embossing.


Next I used Tim Holtz distressed mini inks - Mowed Lawn & Broken China.  Afterwards I sprayed with water and let dry.  Below is the result.


I cut out the sentiment using these super cute dies from Lil' Inker Designs - Dual Dotted Rectangles Dies


Thanks for stopping by and have great day!!!!
 
Diane


Friday, February 12, 2016

Too Cold - Think Sunny Beaches

It's so cold here, I'd rather be at a beach, so I thought about one of my favorite cards I made, but I never posted.  So here it is to warm us up!


I made the card using the AI stamp Lounger's Set.    I colored with my Copic markers. I are some Wink of Stella to add a little glittery look. 


Here's a view from the side

 
You can see how the Wink of Stella colored over top the brown sand makes the sand sparkle and glisten and give a little more texture to the picture.


I also stamped and colored the umbrella from the stamp a second time & cut it out.  I used pop dots to bring the umbrella out for a 3D effect.  I also colored Wink of Stella over my colored umbrella.  I added the ribbon across the top using one of my We R Memory Keepers Weave Sew Ribbon Tool - it makes putting ribbons on easy!


 Thanks for stopping by.  Like always any comments are always welcome and very much appreciated!!


Diane


Saturday, February 6, 2016

LOVE!

Hello!  I made this card for the new Art Impression Challenge Love Love Love! Challenge 177
 
Here's the front:
 
 
And here's the inside:
 
This girl is so fun and cute.  I love the "Shake Your Booty" cards at Art Impression.  This one is from the Dancer Set.  I fussy cut both the front of the lady and the back of the lady.  Well, the back of the lady twice!  I colored and cut just her skirt the second time and used an action wobble to make her booty shake!  I colored her with Copic Markers.  (Skin-E50,E51; Blush-R20; Dress-B04,B05).  The shoes and the earrings were colored with Wink of Stella blue & purple.
 
I have a stamp from Funny Bone with the saying "I LOVE YOU WILL ALL MY BUTT I WOULD SAY HEART BUT MY BUTT IS BIGGER".  But I wanted it in two parts, so I just typed it in word and printed it on my computer.  That way I also had control over the size and font. 
 
For the AI Shake Your Booty card I normally have the front image coming out a window, but I thought for love and Valentine's I would use a heart.    I cut all my hearts using the Ecstasy Crafts Nellie's Choice Multi Frame Dies, Heart, 10-Pack  die set.
 
Here's some side views of the card so you can see the image pop from the front, and the bootie wobble from the back.  :)


Thanks for stopping by!  Any comments are greatly appreciated.
 
Have a great day!
 
Diane
 
I also included this card in the Challenge #148 in the Aud Sentiments Challenge blog.
 

Monday, February 1, 2016

AI Paper Piecing

 AI - Paper Piecing Party! Challenge 176
 
 
I stepped through the tutorial that Diane on the AI design team posted, and I thought I would give it a try.  Paper piecing involves a lot more cutting and a lot less coloring. 
 
I just love all the Art Impressions Girlfriends stamps.  I have almost all of them!!  For this card, I used Art Impressions Stamp Uptown Girls Set.  Then I just used the simple sentiment of "Friends" from the Live Laugh Love set.
 
For each of the girls outfits I used paper from my stash.  I colored their skin & hair with Copic Markers.  I colored the girl's jewelry, glass frames, and shoes with Wink of Stella coloring pens to add little more glitz to match their glitzy outfits. 
 
I had a pink feather that I received in a grab bag, and I had saved it "just in case".  I decided to cut a few pieces of the feather to add some textured to the first girl's boa.  Also for the big flower on her dress, what better to use then a flower embellishment from my stash.
 
I had a lot of fun picking out the papers I wanted to make their outfits.  It was like playing paper dolls!
 
Thanks for stopping by!   Any comments and advice are always greatly appreciated!!
 
Have a wonderful day!
 
 
Diane
 
ADDITIONAL NOTE: I was honored to receive the Top Spot in the AI Paper Piecing Challenge with this card. I'm so excited I just can't stop smiling. Thank you Art Impressions!!! 
 

Art Impression Stamp

Here's a birthday card I made from the new AI stamp. Love this stamp!   
I colored with my Copics and the. Added the balloon animals from my Avery Ellie stamp and die set. 

Here's the same card but with a yellow base. 

Thanks for stopping by!  Have a great day!!